Specifying settings for route planning
Here you will find out which settings can be made for the route planning.

Selecting a vehicle
-
Choose the desired vehicle using the drop-down list.
Notes:
If you wish to edit the selected vehicle, click  . You can create your own vehicle profiles in vehicle management (see Creating vehicles).
Selecting the cost profile and wage profile
-
Choose the desired profiles from the drop-down list.
Note: Cost and wage profiles are required to calculate costs in a quotation calculation, for example. You can create different cost and wage profiles in the Vehicle management use case (see Create cost profile and Create wage profile).
Selecting a driver
-
Enter whether the vehicle has one or two drivers.
Note: This information is relevant if you are taking into account driving times and rest periods in route planning (see Enabling routing parameters) and when calculating costs.
Defining arrival or departure time
-
In the Times section, use the buttons Departure or Arrival to specify which of the two applies to the time.
-
Enter the required date and time.
-
Use the
 button to specify if the departure or arrival time is fixed.
Tip: Specify a fixed departure or arrival time when opening hours are entered for stop-off points (see Entering times ) and a route calculation with time slots is carried out (see Time slot).
Enabling routing parameters
TLNplanner internet provides various routing parameters which can be enabled or disabled for the route calculation.

You can activate or deactivate individual routing parameters with a click of the mouse
The details of the routing parameters are shown when you click on the  symbol
Notes:
If you right-click on some routing parameters, a context menu will appear with extra settings options.
| Element | Description | ||||||||||||
|---|---|---|---|---|---|---|---|---|---|---|---|---|---|
|
|
Note: Only active if the route runs through one or more countries in which minimum wage legislation also applies to transports. Opens the minimum wage window in which you can specify for every stop or every order whether it is a pickup/delivery or cabotage. Here you can also specify that it is always cabotage if two stop-off points are in the same country. |
||||||||||||
|
|
Note: The routing parameter is not active for car-. Using the button, specify whether the load status of the vehicle is to be considered Loading statusFull: The route calculation is performed with vehicle's gross permitted weight. Note: The maximum load is determined by the vehicle's technical data. Semi-laden: The route calculation is carried out using half the GVW. Empty: The route calculation is carried out with the vehicle's unladen weight. As entered: If you enter pickup and delivery quantities for the stop-off points, the route calculation is carried out with the actual weight of the vehicle (see Editing stop-off points).
TBC load codeThe load code influences the calculation of the route. According to the load code which is entered, tunnels which are barred for this load are not considered for the route planning. Notes: You use the routing parameter Load to specify the load code for the entire trip. If you only have a hazardous load on one leg of your trip, you can enter the appropriate load code at the pickup point (see Editing stop-off points or Create orders).
|
||||||||||||
 Traffic Traffic |
If this button is enabled, the selected traffic disruptions are included in the route planning. You can right-click to select the type of traffic disruption: Include all traffic disruptions. Include all blocks. Tip: Select these options if planning routes at short notice. Only include permanent blocks/permanent roadworks. Tip: Select this option if you are planning routes in advance. |
||||||||||||
 Route corridor Route corridor
|
If the button is enabled, addresses are searched for along the route. Right-clicking opens a context menu where you can specify which database should be included in the search. Tip: In Settings, you can enter the size of the radius in which addresses are searched for (see Route planning settings). |
||||||||||||
 Time slot Time slot |
If this button is enabled, opening hours which were entered for the stop-off points are included in route calculation (see Entering times ). |
||||||||||||
 Driving times and rest periods Driving times and rest periods |
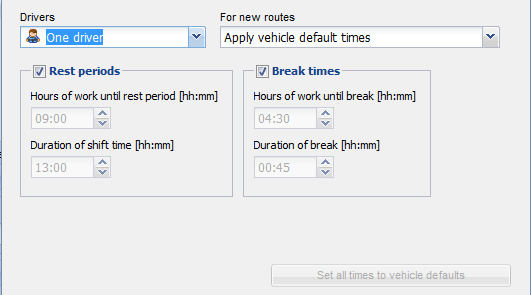
If this button is enabled, driving and break times are included in the route calculation. Right-clicking opens a context menu where you can change the driving times and rest periods.
The default times are entered and are saved for the selected vehicle (see Break times tab). The Drivers drop-down list is used to specify if the vehicle has one or two drivers. The For new routes drop-down list is used to specify which remaining times are used in the new calculation of a route with this vehicle.
The checkboxes are used to specify if rest periods and/or break times are included in the route calculation. Custom values can be entered in the Driving time until rest period, Duration of shift time, Driving time until a break and Duration of break fields. |
||||||||||||
|
|
If the option is enabled, TLNplanner internet takes into consideration the historical traffic data for the roads to be driven when calculating the driving time. As a result of the route planning, you receive three time values:
Note: If the Traffic history option is deactivated, standard time and driving time are equal. |


Note: In the settings there are other ways of influencing the route calculation. For example, specify which method you wish to use to calculate emissions (see Specifying settings for the emissions calculation).
More detailed information on the additional settings for the route planning can be found in the article Route planning settings).